> For the complete documentation index, see [llms.txt](https://docs.constellationnetwork.io/llms.txt). Markdown versions of documentation pages are available by appending `.md` to page URLs; this page is available as [Markdown](https://docs.constellationnetwork.io/metagraph-development/guides/deploy-a-metagraph.md).
# Deploy a Metagraph
This tutorial will guide you through the process of deploying your Euclid metagraph project to a cloud provider and connecting to IntegrationNet or MainNet. We focus on AWS specifically but the basic principles would apply to any cloud provider.
**Deploying a Metagraph with Euclid**
{% hint style="warning" %}
Utilize Euclid for deploying metagraphs efficiently. Initiate deployment to your remote hosts, including all necessary files and dependencies, with the following command:
```
./scripts/hydra remote-deploy
```
To start your nodes, execute:
```
./scripts/hydra remote-start
```
For comprehensive guidance on utilizing these commands, consult the README file in the [Euclid repository](https://github.com/Constellation-Labs/euclid-development-environment/blob/main/README.md).
Additionally, we offer a demonstration video showcasing this functionality, available [here](https://twitter.com/codebrandes/status/1765904204600938505).
{% endhint %}
### Architecture[](https://docs.constellationnetwork.io/sdk/guides/deploy-a-metagraph/overview/#architecture)
There are many kinds of potential deployment architectures possible for production deployments depending on project scaling needs. Here, we will focus on a deployment strategy that uses a minimal set of infrastructure components to simplify deployment and reduce cloud costs. For most projects, this offers a good starting point that can be expanded on later to meet specific project needs.
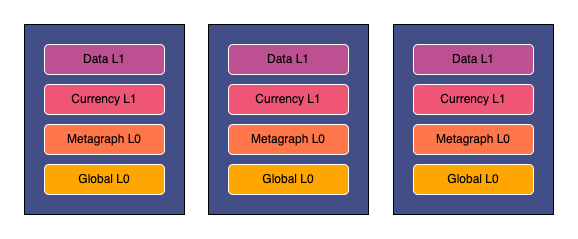
We will be deploying a [Metagraph Framework](/metagraph-development/metagraph-framework/overview.md) metagraph using a [Data Application](/metagraph-development/metagraph-framework/data.md). This type of metagraph consists of 4 layers in total:
* **Global L0:** Hypergraph node on IntegrationNet or MainNet
* **Metagraph L0:** Metagraph consensus layer
* **Currency L1:** Metagraph layer for accepting and validating token transactions
* **Data L1:** Metagraph layer for accepting and validating data updates
In this guide, we will deploy all 4 layers to each of 3 EC2 instances. In other words, we will only use 3 servers but each server will act as a node on each of the 4 layers. This allows all layers to have the minimum cluster size to reach consensus (3), while also being conscious of infrastructure costs by combining each layer onto the same EC2 instances. Each layer will communicate over custom ports which we will configure as part of this process.
**Deployed Architecture:**
### Requirements[](https://docs.constellationnetwork.io/sdk/guides/deploy-a-metagraph/overview/#requirements)
* AWS Account
* A metagraph project built and tested locally in Euclid
* At least 3 **`p12`** files. Refer to [this guide](/metagraph-development/guides/working-with-p12-files.md) on how to generate p12 files.
* Ensure that the ID of all your **`p12`** files is on the appropriate network seedlist (IntegrationNet or MainNet) otherwise, you won't be able to connect to the network. Check the [seedlist](https://constellationlabs-dag.s3.us-west-1.amazonaws.com/integrationnet-seedlist) to verify your IDs are included.
### Guide[](https://docs.constellationnetwork.io/sdk/guides/deploy-a-metagraph/overview/#guide)
This guide will walk you through a series of steps to manually configure your nodes via the AWS console. We will configure AWS, build all code on a base instance that we will then convert to an AWS AMI to be used as a template for creating the rest of the nodes. This allows us to build once, and then duplicate it to all of the EC2 instances. Then we will configure each of the nodes with their own P12 file and other details specific to each node.
**We will walk through the following steps:**
* [Configure security groups](/metagraph-development/guides/deploy-a-metagraph/security-groups.md): Create a security group for the nodes and open the proper network ports for communication.
* [Setup SSH keys](/metagraph-development/guides/deploy-a-metagraph/key-pairs.md): Create SSH keys to securely connect to the nodes.
* [Create a base instance](/metagraph-development/guides/deploy-a-metagraph/base-instance.md): Build a server image as an AWS AMI to be reused for each of the nodes.
* [Configure the base instance](/metagraph-development/guides/deploy-a-metagraph/base-instance/connect-to-the-instance.md): Add all dependencies and upload metagraph project files to the base instance.
* [Generate AMI](/metagraph-development/guides/deploy-a-metagraph/base-instance/generating-ami-image-from-base-instance.md): Convert the base instance into a reusable AMI.
* [Generate EC2 Instances from AMI](/metagraph-development/guides/deploy-a-metagraph/base-instance/launching-instances-from-ami.md): Using the AMI created in previous steps as a template, generate all 3 EC2 instances.
* [Configure Layers and Join](/metagraph-development/guides/deploy-a-metagraph/start-metagraph-instances/configuring-p12-files.md): Configure each of the 4 layers and join to the network.
[Edit this page](https://github.com/Constellation-Labs/documentation-hub/edit/main/sdk/guides/deploy-a-metagraph/01-overview.md)
---
# Agent Instructions
This documentation is published with GitBook. GitBook is the documentation platform designed so that both humans and AI agents can read, navigate, and reason over technical content effectively. Learn more at gitbook.com.
## Querying This Documentation
If you need additional information that is not directly available in this page, you can query the documentation dynamically by asking a question.
Perform an HTTP GET request on the current page URL with the `ask` query parameter, and the optional `goal` query parameter:
```
GET https://docs.constellationnetwork.io/metagraph-development/guides/deploy-a-metagraph.md?ask=&goal=
```
`ask` is the immediate question: it should be specific, self-contained, and written in natural language.
`goal` is optional and describes the broader end goal you are ultimately trying to accomplish on behalf of the user. GitBook uses it to tailor the answer towards what is most useful for that goal.
The response will contain a direct answer to the question and relevant excerpts and sources from the documentation.
Use this mechanism when the answer is not explicitly present in the current page, you need clarification or additional context, or you want to retrieve related documentation sections.